Methods
Experimental Setup
Overview
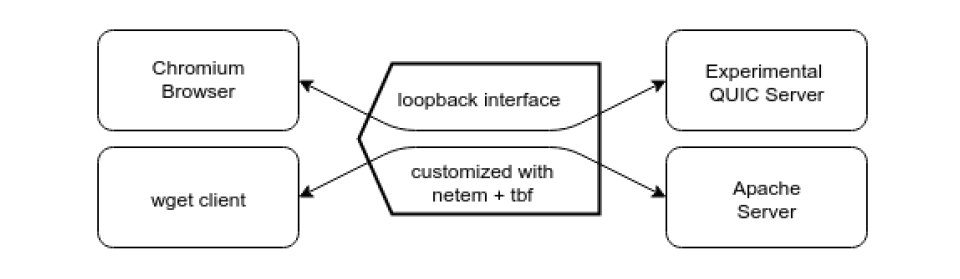
A 33.6 MB testfile index.html will generate in /var/www/html/ and we will get it from quic server and apache2 server with quic client and wget. The protocal two way used is QUIC and TCP. And we will run the experiments under difference network enviroments.
For practical, we will use simulate enviroment in local. We use tc netem and tbf to config local loopback interface.
Experimental Platform
Hardware
| Hardware | Parameters | | --------- | ---------------------------------------- | | Memory | 16GB | | Processor | Intel® Xeon(R) CPU E3-1230 v5 @ 3.40GHz × 8 | | Disks | SAMSUNG 850 EVO |
Software
| Software | Parameters | | -------- | ----------------------- | | OS | Ubuntu16.04 | | OS-type | 64 bit | | Kernel | Linux 4.4.0-104-generic | | GCC | GCC 5.4 | | Python | Python 2.7.12 |
Compile Chromium
Because of the quic protocal is embedded in Chromium, so we must build our quic_server and quic_client from the source of Chromium.
- clone the source of chromuim
- building for the first time, install dependencies
./src/build/install-build-deps.sh
- Build the QUIC client, server, and tests:
cd src
gn gen out/Default && ninja -C out/Default quic_client quic_server net_unittests
- Prepe test data from www.example.org
mkdir /tmp/quic-data
cd /tmp/quic-data
wget -p --save-headers https://www.example.org
- Generate certificates In order to run the server, you will need a valid certificate, and a private key in pkcs8 format.
cd net/tools/quic/certs
./generate-certs.sh
cd -
- In addition, a CA certificate was also generated and trusted by following the instructions in the ‘Linux Cert Management’ page located in the Chromium website
Apache2 Server
We will test TCP with Apache2 Server, to be closer to the reality world, we config the server with TLS.
- Create the SSL Certificate
- Configure Apache to Use SSL
- Adjust the Firewall
- Enable the Changes in Apache
Prepare for Experiments
Before we start the experiments, we need finished this four steps:
- Set loopback interface mtu to 1500
- IPv6 disabling on loopback
- Start Apache2 Server
- Start QUIC Server
See detail in env_setup.sh.
Run and Analyse
Usage
./scripts/env_setup.sh
./scripts/run,sh
./scripts/analyse.sh
The Emulating Enviroments
- Control Parameters bandwidths : Limiting the maximum link bitrate. delay : One-way delay to packets that are going from a server to client. losses : Drop packets that are going from a server to client. spikes : A period of time(default 200ms) when bandwidth drop to a certain percentage.
- Parameters with values used in our experiments
protocal = ['quic', 'tcp']
bandwidths = ['100', '40', '5']
delay = ['10', '50'] or ['10', '20', '40', '60', '80', '100', '120']
losses = ['0.0', '5.0']
spikes = ['0', '1']
Details
- Generate raw data
This function is finished in
run_benchmark.py, the scripts include three steps:
- Generate the
Params Queuefrom the arguments parsing - Configuration of local loopback interface for every params
- Data captured with tcpdump, and stored into
./raw/for every params.
- Data Analysis
This function is finished in
preprocess.pyandaverage.py, the scripts include three steps:
- Clean the raw data and stored the preprocessed data in
./processed/, in order to extract only the data required (timestamp and bytes). average.pyaverages different instances of the same test. By default, each test is run five times.
- Visualization
This function is finished in
plot.pyandplot2.py, the scripts include three steps:
- Creates all plots that are not time series (bandwidth, overhead and time) vs (delay, bandwidth, packet loss)
- Generates time series for the processed data extracted from the tests in the
/processed/folder